This article is going to walk through all of the steps required to demonstrate how to secure columns in a SQL Server database.
We’re going to create a basic table to hold the information, a certificate, and a key to project some of those columns and grant the appropriate rights so permissioned users can access the values.
The first thing we’re going to need is a database. For the sake of easy clean up, I’m going to create a brand new one for this. We’ll call it CaveOfWonders.
CREATE DATABASE CaveOfWonders;
Magic. We know we’re going to be creating a certificate and a key, so let’s get those set up now. We’ll choose a master password for the key, so be sure to make a note of this so it can be recorded for later use.
CREATE MASTER KEY ENCRYPTION BY PASSWORD = '4wholeNewWorld!';
GO
CREATE CERTIFICATE magicLamp WITH SUBJECT = 'To obsfucate Client Secrets';
GO
CREATE SYMMETRIC KEY aladdin WITH ALGORITHM = AES_256 ENCRYPTION BY CERTIFICATE magicLamp ;
GO
OPEN SYMMETRIC KEY aladdin DECRYPTION BY CERTIFICATE magicLamp;
We just need one more thing: a table to add the information we’ll be storing. Let’s create it and put some data into it.
And that’s it! We now have a table containing sensitive values which we can select and use in any other application that we can query SQL Server from, right?
USE CaveOfWonders;
SELECT *
 FROM dbo.ClientSecrets;
Not quite. We did not provide any instruction on how we should attempt to decrypt the values, so SQL Server just didn’t decrypt them. OK, so let’s have Aladdin use his lamp!
OPEN SYMMETRIC KEY aladdin DECRYPTION BY CERTIFICATE magicLamp;
SELECT *
  FROM ClientSecrets;
Nope! We’re now using the key and certificate, but we need to provide explicit instructions to decrypt the values, as shown in the code below.
OPEN SYMMETRIC KEY aladdin DECRYPTION BY CERTIFICATE magicLamp;
SELECT *, CONVERT(NVARCHAR(128), DecryptByKey(EncryptedSecret)) AS 'Decrypted ID Number'
  FROM ClientSecrets;
Excellent, we can now store, project and retrieve secrets in this table. Any user who has been granted the permissions to use the certificate and the key can now do so to retrieve the secrets.
To grant the permissions required you’d need to add the following to a user who already has read access on the table
GRANT VIEW DEFINITION ON CERTIFICATE :: magicLamp TO SecretReaderUser;
GRANT VIEW DEFINITION ON SYMMETRIC KEY :: aladdin TO SecretReaderUser;
In order to make use of the Azure blob stores life cycle management, you need to create your backup as block blobs. In order to create block blobs you need to create the backup using a SAS token credential. Creating a SAS token is pretty straightforward. Let’s assume the blob store is called myblobstore.
A SAS credential is always named as the full path:
https://myblobstore.blob.core.windows.net/
Let’s also assume we have generated a SAS token for the blob store and it’s value is:
Notice that the identity is SHARED ACCESS SIGNATURE. This is always true for SAS credentials. The Credential name should have the name of the container you want to use appended to it. In this example we’re using a container called my-servername (which should be created ahead of time).
Great, we can now use this credential to back up to the container my-servername on myblobstore by creating a backup to URL:
BACKUP DATABASE [myDatabaseName] TO URL = 'https://myblobstore.blob.core.windows.net/my-serverName/mydatabaseName/FULL_backup_20220427_201112.bak'
Awesome, we can now have lifecycle management automatically move this backup around according to the rules we configure, move it between tiers, and ultimately delete it.
So, what’s so hard about that? Nothing really! The problem becomes when you need to change that SAS token out, either because it’s suspected of being compromised, or because you know the importance of rotating sensitive information periodically, you know your security team will come knocking if you don’t and/or you’d rather not fail a security audit.
If you wanted to, you could just drop and recreate the credentials on all the servers using a SAS token for a blob store by hand, each time you retire a SAS token.
That might work well if you only have a couple of servers and a single blob store to worry about and consider leaving toil job security. Usually, though, we want a way to automate this kind of task.
So, on to the magic!
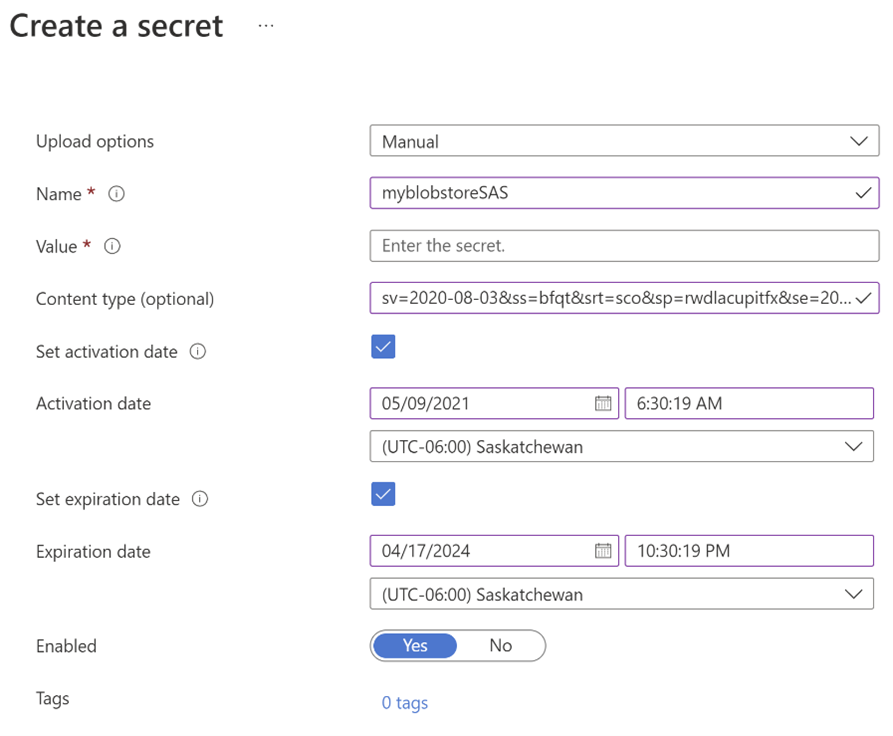
We can store the SAS token and URI in Azure Key Vault. Now the chances are you won’t be changing the URI often, but if you wanted to change the blob store to another one (for a reason) you could just alter the stored URI. The SAS token can be stored in a secret for a duration, using active and expiration dates.
But how do we retrieve this and make use of it from within SQL Server? We can use a SQL Agent job step to execute some PowerShell that calls the Azure APIs to collect the token. There are multiple steps to consider when doing this, but this article will walk through each of them.
The first step is going to be authenticating with the APIs and collect a token.
To do so you’re going to need an Azure App Registration. You can create one of these from the Azure Portal. Navigate over to App Registrations, and click New Registration. Make the appropriate selection from the Supported Account Types. You likely want to use Default Directory Only, however you should be sure, so check with your network engineer(s)..
Once you have your registration, navigate to the API permissions and grant it permissions to access your key vault. Think about the permissions you want to grant in respect to the minimum permissions you’ll need. If you intend to use it for other purposes later, you may want to grant additional or elevated permissions.
Under Certificates and Secrets you can then create a secret. Consider the duration you want to leave it usable. We will use the secret and the client id from the overview page to authenticate with the API, and then use the token returned by it to access the key vault APIs and retrieve the values needed to create a brand new credential each time we run the job step.
Similarly, this PowerShell requires the $auth.access_token to pass in, the name of the secret and the base url of the key vault.
It’s important to note at this point that the key vault API returns all of the versions of a secret, and orders then alpha-numerically by the secret id which is a unique identifier, which is an interesting choice. Because of this you’ll need to order the results properly in order to collect the correct one, but have no fear:
This PowerShell creates a DataTable, and brings all of the secret version into it. Then we can use it to sort them into an appropriate DataView. Now we know which version of the secret we need to ask for, we can at last call for it, and get the value:
Since we’re going to be doing this all twice, once for the URI and once again for the SAS token, it makes sense to wrap it all up into a function, to make it easy to re-use. Here’s the whole function.
MySecretSAS is the name of your secret holding the SAS token.
00000000-0000-0000-0000-000000000000 is your Azure tenant ID, which you can find in the Azure Portal by navigating to the overview page in Azure Active Directory and inspecting the basic information section.
mykeyvault is the name of your Key Vault which hosts these secrets
that you have a server at my-toolsServer.domain.local which has a database called MyToolsDatabase which contains a table called settings.clientSecrets which has the columns secretName and EncryptedSecret which is encrypted by using a certificate secured using a key called settingsSecretKey.
That latter point is a topic unto itself, which I’ll cover in a future article in detail. If you’d rather use another method to expose the client ID and client secret to the function, simply set the variables $client_id and $client_secret however you’d like.
Now we have the secrets, we can use them to build some T-SQL:
This will drop the credential (if it exists), and create it with the values from the key vault secrets on the server $serverUrl.
Using this as a step before your backup job should ensure you always get the latest secrets from your Key Vault where the secrets are currently valid and enabled, and use them to refresh the credentials on any SQL Server you run the job on. It’s easy to configure different servers to use different blob stores and secrets. All you need to do is make sure you have available and valid SAS tokens in your vault for the current date, or have them created and stored ahead of time, if that is allowed under your organization’s security protocols.
It’s not specifically necessary to run the PowerShell as a SQL Agent step which is part of your backup process. It could be run by any other scheduling process, such as Windows Scheduled Tasks, separately from the backup process. As long as the process is triggered to coincide with, or pre-empt the usage of a credential which may have expired you will still benefit from the process.
And there you have it, SAS tokens are now yours to command, and automatically keep updated!
(This post has been migrated from a previous blog. It was originally posted July 26, 2022)
I recently was tasked with reviewing the educational materials available to determine where my teams time would best be spent. I reviewed a three part course from LinkedIn Learning and the learning path for Microsoft’s DP-300 exam offered through Microsoft Learn.
I was very pleasantly surprised with the quality of both options, but I was absolutely blown away by the content and depth of the learn path.
There are 7 learning paths for the entire thing, comprising 21 modules, 170 units with an estimated 18:15 hours (or 1095 minutes)! Not every unit was amazing, of course, but there is enough good quality material for a junior or intermediate DBA to soak up, and plenty of great content for a more senior DBA who’s looking to brush up or hone their Azure knowledge.
With just the one module, this is exactly what it claims: and introduction to environment and options available. There’s some good detail on the features available for the three levels.
5 modules of detail about the IaaS and PaaS offerings in Azure (Azure DB and Azure Managed Instance). You’ll find good descriptions of the options available for both and some good examples of use cases. You’ll also find some great information regarding the various tools and options you can use to evaluate migrations and compatibility checks. Some of these tools can also be used to perform the migrations.
This path is all about the security features, both baked into Azure and various methodologies to keep your data encrypted through it’s various states. You’ll also find details about Azure Purview and Database Ledger in here.
In this path you’ll learn about Azure Monitor and how it can interact with perfmon counters and extended events before moving on to cover the various storage options within Azure, some Microsoft recommendations for that. You’ll learn about Intelligent Query Processing and possibly be bored reading about index and statistics maintenance, yes, Microsoft still advocates it, despite what various notable community personalities have said (wink).
This was a great lesson on the optimizer and why it does some of the things it does, how a plan is generated. You’ll also read about Light Weight Query Profiling and the 2019 feature Last Query Plan Stats. Then it’s off for a refresher in Waits and Query Store before a brief stop with potential bottlenecks (and some suggested remediations!) Next up is a ICYMI session on Normalization and the normal forms, Denormalization (and when you might want to use it) and Star/Snowflake schemas. Then you’ll revisit waits, index issues and an overview of the 2019 feature Resumable Indices and finish up with query hints and why you probably shouldn’t use them and a preview of the Query Store Hints feature currently in preview.
A whirlwind tour of some of the tips and tricks for automating Azure tasks. You’ll work through ARM, Templates and Bicep and how to start using some of that with PowerShell and the Azure CLI. Maintenance plans in azure (which are still really SSIS) where you can still use SQL Agent, and how you can make use of operations, notifications and alerts. Finally there’s some good information on Elastic Jobs, Azure Automation, Azure Functions and Azure Logic Apps and how you can tie some of that together to help keep tabs on your environments (and some ways you can have it take action for you).
A reasonable amount of this was a rehash of some of the basics, and some of it even reiterated other parts of the paths before it, but that’s not necessarily a bad thing. You’ll find descriptions of RTO and RPO as well as differences between FCI, AGs and Log Shipping and how they might impact them. There’s a great module that get’s pretty deep into all the machinations required to make High Availability work, and how it works in Azure. You might want to share this one with your SRE pals, as there’s some nuggets to be gleaned from their side of the world too. Finally (I was a zombie by this point) time is spent on backups. The different types of backups (it’s not just your Dads Database/Log backups anymore!), your storage options (did you read my article on rotating SAS tokens?) and the options you have for each tier. Rewards
Phew. That was a lot of effort. BUT you will be richly rewarded with a shiny “Trophy” for each one you complete, and they claim you should learn all you need to take the actual DP-300 Exam.
(This post has been migrated from a previous blog. It was originally posted July 26th, 2022)